5 Unique Gifts You Can Make Using IOD Stamps

Al items decorated with IOD stamps

Personalised and handmade gifts are always a lot more special to the recipient. Here at Bee Creative Art Hub we always think about up-cycling old furniture and making things from scratch to be kinder to our environment. Below you can find information and instructions on how to create your own personalised gifts. You can also look at the pictures of our own designs for ideas.

things you need for the project
1) Drink Coasters

What you will need:

-Plain wooden coasters

-Your choice of IOD stamps

-Chalky finish furniture paint (any colour you like)

-IOD ink (any colour you like

-Non-tamishing wax gilt (metallic)

-Metallic finishing wax or clear finishing wax

Method:

Step 1- Take your plain set of coasters and pick a colour that you would like to paint them. We recommend using a chalky finish furniture paint which helps give the coaster a vintage and worn look later on.

Step 2- Once the paint dries, you can either take a different colour and dry brush the coasters to age them or simply take some sandpaper and sand away the paint a little bit.

Step 3- Now its time to pick your stamps; apply ink to your chosen design and gently press it down on your coasters. You can use multiple ink colours depending on the kind of design that you’re going for.

Step 4- You can now add a bit of metallic non-famishing wax gilt to make your coasters shine and catch light in some areas. This step is optional.

Step 5- Finally you can add some finishing wax. Use metallic for a slightly pearly finish or clear for a more toned down look.
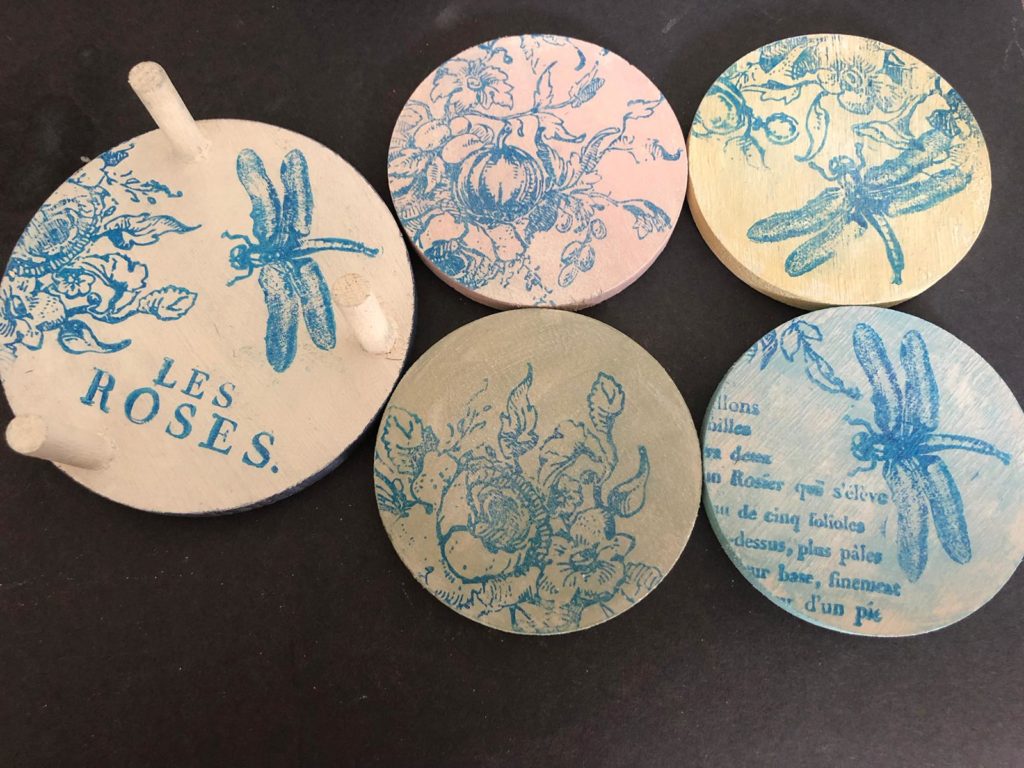
Finished coaster

2) Tote Bag

What you will need:

-A plain tote bag

-Your choice of IOD stamps

-Fabric paint or chalky finish furniture paint diluted with water (any colour you like)

-Metallic fabric paint (any colour you like)
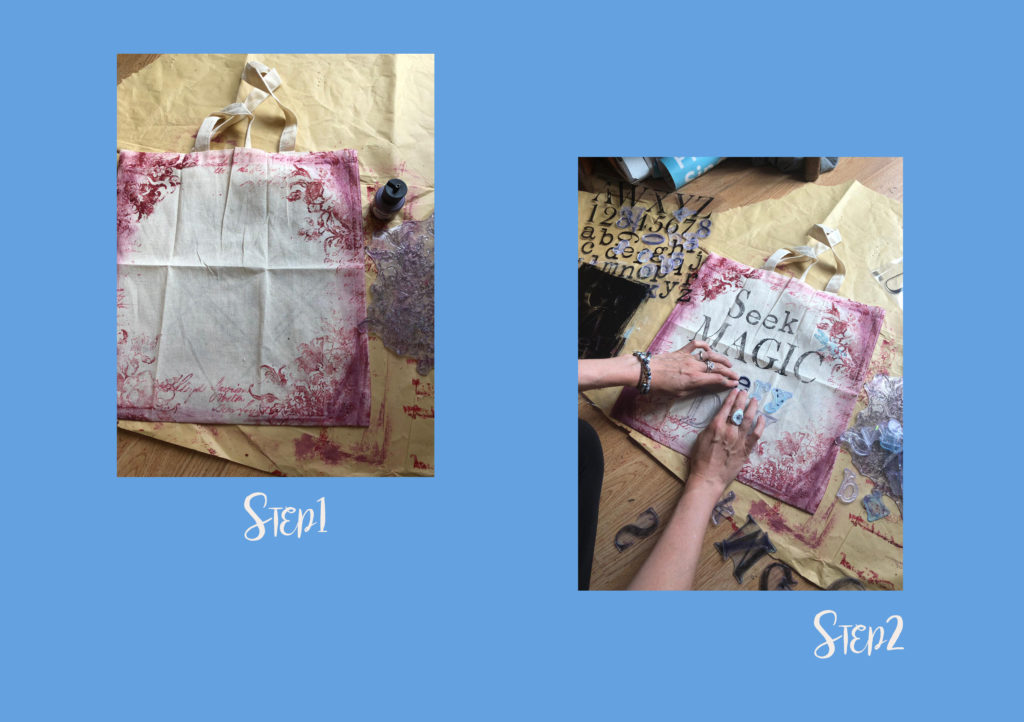
Steps to decorate the bag

Method:

Step 1- Take your plain tote bag and decide whether you want to paint the edges or leave them plain. 

Step 2- Once you’ve done this you can start choosing you stamps and using fabric paint to print your design on the bag.

Step 3- If you like, you can add some metallic fabric paint to your design to make it stand out.

Step 4- Let the paint dry and then iron the bag to seal in the paint.

rrem_soft

3) Tea towels

What you will need:

-A plain tea towel

-IOD ink-Your choice of stamps

Method:

Step 1- Plan the design that you want to put on your tea towel and choose your stamps.

Step 2- Apply the IOD ink to your stamps and then print your design on.

Step 3- Iron the tea towel to seal in the ink.

rrem_soft

4) Pillowcase

What you will need:

-A plain pillowcase

-Your choice of stamps

-Chalky finish furniture paint ( diluted if necessary)

-IOD ink

Method:

Step 1- Plan your design and pick your stamps.

Step 2- Start applying paint or ink to your stamps and printing your design.

Step 3- Iron the pillowcase to seal the design.

rrem_soft

5) Upcycled chair

What you will need:

-An old chair (preferably prep and paint it beforehand)

-Some plain fabric

-IOD ink

-Fabric paint

Method:

Step 1- Paint and prep your chair. You can later sand some of the paint off to make it look worn and vintage.

Step 2- Swap the old fabric of the seat for some new plain fabric.

Step 3- Plan which stamps you are going to use.

Step 4- Apply ink to your stamps and start printing directly onto the fabric. You can use fabric paint for accents.

Step 5- Iron the seat to seal in the paint.

finished chair

Fractal Drawing

I would like to share with you one of the great ways to get your creativity growing and even help your mind to relax and tell you were and how to work with your inside and help to recover. This text I translated from the article that was written in Lithuanian magazine Ji by author V.Liutkiene. The link to the article is here https://www.15min.lt/gyvenimas/naujiena/laisvalaikis/nupieskite-savo-fraktala-1038-242760

I myself personally had a great opportunity to try this technique when I was visiting Lithuania and had great results and how it surprised me of simplicity and fun exercises that helps you to build great relationship between you and your children. Also I was given this practice to my students in art class and I can see great result for children to relax and find the ways to creativity.

What is Fractal

The fractal drawing is made of spontaneously drawn lines and areas of various sizes and shapes that are coloured in with colour pencils. This method was discovered in Russia, by authors T. Z. Polujachtova and A. E. Komov that they called it analytical diagnostics, forecast and correction by the fractal method of human condition. The term “fractal” comes from the Latin word fractus, meaning “made from parts”. However, let’s leave the theory and talk about the method. The phrase that, ‘everything what is simple, is brilliant’ is very suitable for describing fractals. To learn to draw fractals, you do not need special abilities, this can be done by people of all ages. If you have a desire, drawing paper, a black pen and coloured pencils, you can start.

How to draw 

One of the conditions for the drawing of basic fractals is to follow the rules. This is what helps to personify and improve your personality. To get started, you need A4-format drawing sheets, a black pen and as many different coloured pencils as possible.

Contour drawing

Place a piece of paper horizontally in front of you and hold the black pen on it. Close your eyes and start draw a continuous line for about a minute. Try to fill as much paper area as possible. Draw a line at a clear, moderate speed. Avoid duplicate shapes, draw lines in different ways: horizontal, vertical, diagonal, oval, circular, not just specific shapes. Leave the white background perfectly clean around your drawing. When drawing a line, it is necessary to close your eyes or put the blindfold, because in this way we release ourselves from external stimuli and appeal to the subconscious “I”. Connect the start and end of the line to the nearest line. The large, medium, and small spaces should be approximately equal in the drawing. When you open your eye and noticed a lot of large spaces in the picture, close your eyes and draw more continues lines for a few seconds.

Colouring

Draw the first four fractals in the colours chosen by your subconscious, so close your eyes before picking the pencil. One colour pencil colour in one space randomly selected from 1 to 12 spaces. Do not colour the adjacent space in the same colour unless they are oblique. Colour it evenly, neatly and seamlessly. For the smallest areas, you can use coloured pens. Draw one fractal a day for 21 day.

More to know

Keep in mind that from the fractal 7 all the drawings must be different. If you open your eyes, and the result is the same again, although it seems like you were drawing always a different pattern. This is due to the fact that the personal characteristics of man, forces to draw one or another way, so to improve yourself, you have to deal with yourself. So the fractal is a great tool for that. If all your drawings are similar, drawing fractals will not bring any benefits. Try to make every painting look different more beautiful, needless, more artistic, so you can not take your eyes of it. Soon you will get a reward: if someone secretly hopes to become calmer, after drawing 7-10 fractals, soon will feel that, it is becoming more difficult to strike out of balance, the others maybe more bold and determined.

Colours

The meaning of fractal colours:

White is an undisclosed energy. If the fractures remain white, then the author does not use all of his powers.

Yellow means the ability to receive, process and transmit information. The person who loves yellow colour is curious, open, trying to express himself.

Green is the colour of a healthy and balanced energy.

Green dominance shows that a person tends to cooperate, is able to listen and understand.

Blue – peace, stability and balance. If there is a lot of dark blue in the fractal, this can mean depression. The blue is the colour of truth, honesty and faithfulness, which gives peace and confidence. Its surplus indicates that the person is sensitive, vulnerable.

Violet shows an unlimited energy reserve. Its surplus is unmanageable energy that needs to be expressed.

Red provides the opportunity to implement plans that require high energy resources. If there are many red medium sized spaces, something is worrying.

Pink is associated with the feminine side. When it’s dominant, the person is stable, benevolent, calm.

Orange is the colour of life’s force and progress. The person using it is friendly and active, but large areas can mean complexes.

Light brown beige is spiritual energy. A dark brown spot means an upsurge old personal problem.

Lots of grey – waiting for change.

Large black spots – a person is quickly tired, and small in the whole fractal is an initiative, active and dynamic.

You can see some examples of lovely fractals drawing in facebook group @brigitos fraktalai

How to make environmentally friendly jewellery

These ornaments made from old newspapers and old blouses strips. It seems stunningly beautiful and very fashionable.

I am offering the most creative way to reuse an old blouse in to new life.

1. It must be old newspapers, better would be possible to contain the less pictures. Newspapers Chop into very small shreds: the smaller the better. Take your time to chop one sheet at the time.

2. Boil water and pour it all over the torn pieces to cover them. Leave it for a couple of hours, and from time to time stirring the mixture. Pour all the water and try to hand-drill water as possible from the same rag. After that, as far as possible, pour PVA glue.

Divide mixture in to shape or your choice of size balls and beautifully put on a flat surface. Put it on the radiator (if the heating season), if not, you can speed up the process and placed in the oven 100C heat. However, check balls in 30min if it has hardened. When you pull out it should be completely harden.

3. Now we can start to paint. Use acrylic paint that dries quickly and they become slightly glossy, and a good compliance on any material. If you want to have the natural stone look put the first coat of paint in a dark colour.

Apply a second coat that should be light shade and painted only the tip of the brush bristles with very little paint as if tap around the bead, that would expose the primary colour. When you get the desired outcome left a good paint dry out.

4.Then pick up the thickest needle or awl and pierce a hole where you would like the bead would be ajar.

The final result depends only on your own imagination. If you do not want to spend, you want use silk ribbon and tied a bow. Or use old jewellery parts.

Second life for cans and jars

What have in common cans and jars and a cardboard toilet paper rolls? All they can easily become the most beautiful decorations for your home. This technique, which I found in thegraphicsfairy.com, will make very fashionable and very good-looking house, which combine modern style and classic.

1. Jar or tin and toilet roll must be painted black. To get a better coat, they should have two layers of paint over.

2. When the paint is dry, rub the object with the candle that will applied on top of the new layer and later will be easily chafe leaving a black colour underneath.

3. A second layer should be in light colour. Shade can choose according to your desired palette. It is necessary to use acrylic paints that are water resistant and applies good on any material.

4. Once the paint is dry, take a sandpaper and smoothly scrap desired object edges and places where you are seeking more natural antique effect.

5. To make the labels you will need inkjet printer, PVA washable glue and A4 paper (it would be better a little thicker than regular printing paper, but if you do not have, you can use the standard copy paper – just be a little more delicate work is skinning) and Mod Podge Matte-mat-Mate decoupage glue . They can be purchased Amazon.uk online store, priced at around £ 3-4.

First brush A4 sheet with PVA glue and wait until it dry.

6. You pick the logo from the web page from which you can download free images based on your desired design and print on the side which was smeared with glue. Another very important tip: pictures with text to be rotated mirror principle so that then you stick it on the object and peeled it off will be correct way.

7. Then, cut out the table and place it where you want to put a label before brushing the place with Mod Podge. Stick it face inside. Rub, to avoid air bubbles and leave it overnight to dry well.

8. The next day, put your decorated object under the water (if it is – a cardboard roll just moisten the label with your fingers). Wait a few minutes and slowly peel it from starting from the edge. You’ll see how nicely from it peels of as it would be a sticker. If you remember the children body tattoos that you use water to put on your body – the same principle. If not peeling in some places – no problem: leave and then moisten your fingers, rub the paper and it will come off. Do not use sponges or cloths, because they are very easy to rub off.

9. When making a candlestick of toilet roll, cut the sides that would look like burned candle. Although you can see a real candle in the picture, preferably use electric candle – so there will be less fear of causing a fire. When I did this project, I did not have electric candles, so I used as example this tea candle. This candle I wrapped into baking foil and fold edges around the roll top.

10. I used hot glue to make drops and leeks that would look as used candle. Also if you put at the bottom of the candle I would recommend  to be as the gutter. It would be good to use white colour glue to make more realistic look. If you only have a translucent, you can then paint in white. It would be good if you have a transparent varnish put it to the overall project.

Try it yourself and comment what you think about it.

Art Hub We Share

Welcome to Bee Creative Art Hub were we share our ideas and activities for children and adults for your home and just to have fun creative time with children at home.